
Usage
When JumpLab is launched, the following screen will appear:
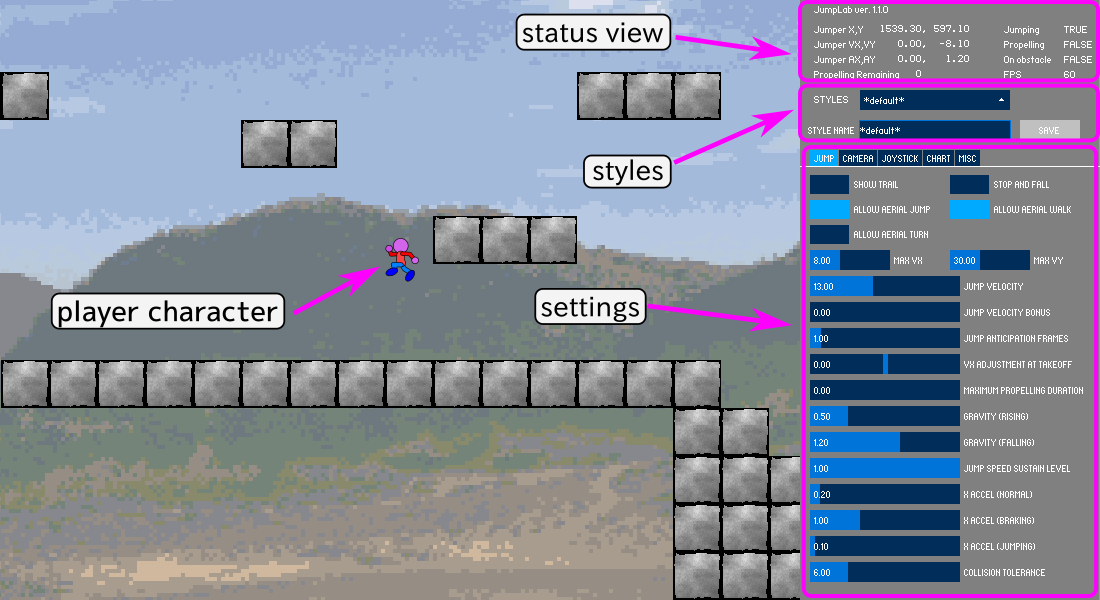
Keyboard control
You can use the left and right arrow kyes to move the purple character left and right←→, and the space key to make it jump. shift key to dash.
p key to pause, and . key to 'step-forward' that advances one frame while pausing.
Parameter adjustment
JumpLab allows you to adjust various parameters of the jump action via the control panel on the right side of the screen.
There are seven tabs, "JUMP1", "JUMP2", "CAMERA", "CHARACTER", "JOYSTICK", "CHART", and "MISC" in the control panel, which can be clicked to change the panel.

For "JUMP1/2", "CAMERA", "CHARACTER" and "JOYSTICK", please refer to the respective pages.
Save/Load
JumpLab allow you to save your settings as a "style" and load it later. JumpLab also comes with a number of pre-packaged settings.
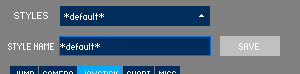
When you click the "STYLES" button, you'll see a list view of all your saved styles and preset styles. The list view is limited to five styles at a time, but you can scroll the view to see/select the remainings. IF you want to reset all parameters, you can choose "*default*" style.
To save the settings, enter a name in the text field labeled "STYLE NAME" and press the "SAVE" button. The preset styles included with JumpLab cannot be overwritten. Instead, change the name to save as a new style.
The modified styles are saved in "data/user_settings.json" in JSON format.
Chart display
“CHART” tab allows you to view the movement of the player character and camera in realtime.
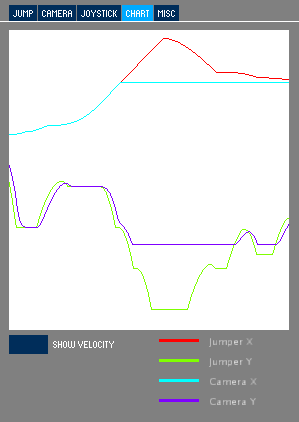
By default, the chart reflect the X and Y coordinates of the player character and the camera. Each value is normalized by the maximum width and height of the screen (note that the units are different for X and Y).
When the “SHOW VELOCITY” toggle is turned on, the chart displays the velocities of the character and the camera. Each value is the difference of the coordinates between the frames multiplied by some coefficients for visibility reason. It is not suitable to know the absolute values of them, but it is useful to observe the change of the velocities.
Miscellaneous settings
“MISC” tab show miscellaneous settings.
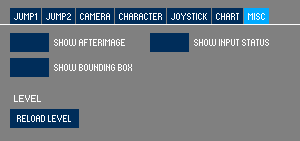
When “SHOW AFTERIMAGE” is turned on, the player character’s afterimage will be displayed instead of red dots when “Show trail” is turned on.
When “SHOW INPUT STATUS” is turned on, the input status of left/right keys and the jump button will be displayed on the screen.
When “SHOW BOUNDING BOX” is turned on, a red frameshowing the player character’s collision detection area will be displayed.
“RELOAD LEVEL” reloads the level data.
Status view
The player character's status is displayed in the upper right corner of the screen.
- Jumper X,Y
- Coordinates of the player character
- Jumper VX,VY
- Velocity
- Jumper AX,AY
- Acceleration
- Propelling Remaining
- The number of remaining frames of a constant speed jump. See Maximum propelling duration for the details
- Jumping
- Whether the player character is jumping or not
- Propelling
- Whether the player character is propelled or not
- On obstacle
- Whether the player character is on obstacles or not
- FPS
- Frame rate in frames per second
Experiments
The standard settings are suitable for slightly challenging platform games that require frequent climbs and descents using footholds and fine tuning of the jump distance. Let's experiment with different parameters to see how the player character's behavior changes.
Thanks to Aerial Control
If 'X accell (jumping)' is set to 0, no aerial control is possible and strict control is required during jumps. This tells us the great advantage of aerial control.
Symmetrical/asymmetrical Gravity
If you set 'Gravity (falling)' to the same value as 'Gravity' (0.5 by default), the trail of a jump wll draw a physically familiar, symmetrical parabola. With this setting, try descending a stair-stepped section, or stepping down from a high foothold and compare the sensation you get from it. Then try to set both of them to about 1.2 and 'Jump velocity' to 22, and see what happens.
Effects of Camera Easing
JumpLab allows you to apply easing only to the vertical movement of the camera. This allows you to compare and verify the different impressions of the different camera behavior during jumps. Let's try switching 'Camera easing' on and off with various jump parameters.
When you turn off camera easing, you can also disable parallax scrolling by set 'BG scroll speed' to 1 to get a clearer impression.
For further reading of the camera motion, Itay Keren "Scroll Back: The Theory and Practice of Cameras in Side-Scrollers" is recommended.